Subcutaneous Injection Procedure
What is a subcutaneous injection? A subcutaneous injection is also called a subQ injection. It is a "shot" of medicine given into the layer between the skin and the muscle. A syringe with medicine in it is attached to a needle. The needle goes through the skin and into subcutaneous tissue. The medicine is pushed into subcutaneous tissue by pressing on the syringe plunger. When the medicine has been pushed into subcutaneous tissue, the needle is removed.
Why did my caregiver choose this kind of shot? Your caregiver chose this kind of shot because of one or more of these reasons:
- The amount of medicine to be given. Small amounts of medicine are given subQ.
- The kind of medicine to be given. Certain medicines must be given into the subcutaneous space.
- The speed at which the medicine needs to act. Medicine that needs to work slowly is given subQ.
What should I know about the syringe?
- A syringe has 3 major parts: the needle, the barrel and the plunger. The needle goes under the skin to put in medicine. The barrel holds the medicine. The barrel has markings on it like a ruler. The markings are for mL's (milliliters). The plunger is used to get medicine into and out of the syringe.

- Subcutaneous shots must be given in small amounts. You will usually get an "insulin syringe" for a subQ shot. Insulin syringes will hold a maximum of 1 mL of medicine. The syringe shows divisions well marked with 10, 20, 30, 40, 50, 60, 70, 80, 90 and 100. 100 is the same as 1 mL. The marking at 50 is the same as half of a mL.
- You may get a "TB syringe". A TB syringe holds up to 1 mL of medicine, and has a needle that is slightly longer than an insulin syringe.
What should I know about the medicine?
- Always know the name of your medicine, and why you take it. Know how much medicine you need to take or give. If you have questions about your medicine ask your caregiver before taking it.
- Medicine given in a shot is measured in mL's (milliliters).
- If you are using a pre-filled cartridge, check your doctor's orders. Be sure you need to use all the medicine in the cartridge. If there is too much medicine, take the cover off the needle and squirt the extra medicine into a sink.
- Look carefully at the ampule, vial, or pre-filled syringe containing the medicine. Check it to make sure 4 things are there:
- The name of the medicine.
- The number of mL's in the vial or ampule.
- The amount of medicine in each mL.
- The last date the medicine is safe to use. This is called the expiration date.
- Make sure you have enough medicine for several doses.
How will I know the medicine is safe to give? Check the ampule or vial to make sure:
- The medicine is not past the expiration date on the bottle.
- There are no crystals or lumps in the ampule or vial.
- The medicine is the correct color. Ask your caregiver or pharmacist what color the medicine should be.
- The name of the medicine is the same name your caregiver told you or wrote down. If you are not sure, call your caregiver.
How do I get the medicine out of an ampule?
- An ampule is a tiny bottle with a narrow neck and a long, thin, hollow top.
- The ampule neck may be scored to make it easier to break.
- The ampule may be colored or clear.
- The ampule may be a dark color or clear, with clear medicine. If it is, it will be hard to see the medicine inside. This is important because the hollow top of the ampule can trap enough medicine to keep you from getting the correct dose.
- You may not take medicine out of the top of the ampule after it is broken. You need to make the medicine go into the bottom of the ampule before you break it.
- To make the medicine go from the top of the ampule to the bottom, flick or snap the top with your finger. You may have to flick it a few times.
- To break the ampule, wrap a wet alcohol wipe completely around the neck of the ampule. Hold the top and the wrapped neck with the fingers of your writing hand. Hold the bottom with the fingers of your other hand. Break the ampule.
- Put the bottom of the ampule on a flat surface.
- Take the cap off the syringe by pulling it straight off.
- Carefully aim the needle through the broken neck of the ampule into the liquid in the bottom.
- Pull back on the plunger to suck the medicine into the syringe.
- Once the syringe has the medicine in it, turn it upside down. The needle should point straight up with the plunger below it.
- Pull down on the plunger until you see that the needle and a small area at the top have no medicine. If necessary flick the side of the barrel. This will make any air bubbles rise to the top of the barrel.
- Push up on the plunger to the correct marking. This will make some medicine squirt out of the needle. It will also force all the air out of the syringe.
How do I get the medicine out of a vial? A vial is a small bottle with a plastic or metal top covering a rubber stopper. The vial may hold enough medicine for one or more doses. If the vial will be used for more than one dose (a multiple dose vial), make sure you write the date you open it on the vial. The medicine may be a powder or a liquid.
- If the medicine is a powder, it has to be made into a liquid:
- Your caregiver will order the correct liquid to add to the powder. There are only two kinds of sterile liquids that may be used: sterile saline and sterile distilled water. They are packaged in vials with metal or plastic tops covering a rubber stopper. Use only the liquid that your caregiver provided or ordered. If you were told to use sterile saline, you may not use sterile distilled water. If you were told to use sterile distilled water you may not use sterile saline. Never use tap water.
- Remove a syringe from its wrapper. If you need to add more than 1 mL of liquid to a multiple dose vial, you will need to use two syringes. The first syringe is needed to add the liquid. The second syringe is needed to give the shot.
- If you have instructions from your caregiver, follow them. If you do not have instructions from your caregiver, read the label or the package insert information. It will tell you how much liquid you will need to add to the powder to make the correct solution.
- Take the metal or plastic top off the sterile saline or sterile distilled water vial. Do not take the rubber stopper off.
- Use an alcohol wipe to wipe the top of the vial with the sterile liquid used to add to the powder. Wipe the top of the vial with the powdered medicine in it. Do not touch the tops of the vials after wiping them.
A vial has a certain amount of pressure in it. When air or liquid is removed, it must be replaced. To do this:
- Put the vial on a flat surface. You will only remove air from the vial. Leave the powder at the bottom of the vial. To remove air, insert the needle into the top of the vial and pull back the plunger. Pull it back the same number of mL's you will need to add liquid to the powder. You may have to pull back harder on the plunger than you expect.
- Remove the needle from the vial with the powdered medicine, and stick the needle into the top of the vial with the sterile liquid. Inject the air into the sterile liquid vial.
- Turn the vial attached to the syringe upside down. Make sure the tip of the needle is in the sterile water or saline.
- The sterile liquid will fill the syringe to about the same amount of air that you put in.
- If you need some more liquid, pull the plunger back a little to get the correct amount. Remove the needle from the sterile liquid bottle.
- Stick the needle into the vial with the medicine and push the plunger all the way down. The liquid should go in easily.
- With the needle still in the vial, push it up to the hub. You do this so you cannot touch the sterile needle. Gently mix the liquid and the powder into a solution.
- If you see powder in the vial, keep mixing it until you only see liquid.
- If you needed to use a large syringe to add liquid, remove the needle and follow the directions below: "If the medicine is already in liquid form" .
- You may use the same syringe to prepare the medicine and to give the shot. If so, turn the medicine and the syringe upside down.
- Pull the needle down so the tip of the needle is in the medicine.
- Pull the plunger back to the correct marking on the syringe barrel for the dose.
- When you have the correct amount of medicine in the syringe, remove the needle and carefully put the cover back over the needle.
- If the medicine is already in liquid form:
- Do not use any medicine that has crystals or lumps in the vial.
- Ask your caregiver or pharmacist what color the medicine should be. Do not give a medicine that is not the correct color.
- You need to add air to the vial in the same amount that you plan to take out in order to get the medicine out of the vial. To do this, you must know how much medicine to inject.
- Pull the plunger on the syringe back to the amount you plan to give.
- Insert the needle into the vial and push down on the plunger.
- Once the air has been pushed into the vial, turn the vial, attached to the syringe, upside down. Make sure the tip of the needle is in the medicine. The medicine will come back into the syringe and stop at or near the correct place.
- When you have the correct amount of medicine in the syringe, remove the needle and carefully put the cover back over the needle.
Things that may go wrong:
- If you put in too much air, the plunger will be difficult to push.
- If you do not put in enough air, the plunger will be difficult to pull.
- If you are using a multiple dose vial, too much or too little air may have been put in for a previous dose. If so, you will have to adjust your pull or push on the plunger.
Where can I give a subcutaneous shot? There are many sites on the body that are safe to give subcutaneous shots. Following is a list of the sites where subcutaneous shots may be given:
- Upper Arm: Uncover the arm to the shoulder to see the whole arm. Have the person getting the shot stand with hand on hip. Stand next to and a little behind the person. Find the area in the middle part of the arm, halfway between the elbow and shoulder. Gently grasp the skin at the back of the arm between your thumb and first 2 fingers. You should have 1-2 inches of skin.
- Abdomen: Uncover the abdomen to see the whole area. Find the waist area. You may give a shot bounded by these landmarks: below the waist, to just above the hip bone, and from where the body curves at the side to about 2 inches from the middle of the abdomen. Avoid the bellybutton. Use the natural line in the middle of the body as a marker. It may be hard to see, but it is there unless it was removed by surgery.
- Thigh: Uncover the entire leg. Find the area between the knee and hip. The middle of the thigh, from mid-front to mid-side, on the outside part of the thigh is a safe site. Gently grasp the area to make sure you can pinch one to two inches of skin.
- Lower back: Uncover the back from the waist to the top of the rear-end. A shot may be given just below the waist to a line that runs across the back above the crack between rear end cheeks. Give the shot between the area where the body curves at the hip and a few inches from the spine.
How do I choose a good place for the shot? Any of the following sites may be used: upper arm, abdomen, thigh, lower back. It is important to keep track of the sites you use and to use a different site each time you give a shot. Some sites are preferred for certain medicines. Ask your caregiver if the medicine you are taking has a preferred site. If you are giving shots to yourself you may not be able to use your back or your arm.
- To keep track of where you are giving shots, make a list of the sites you use. Write down the date, time, and the site each time you give a shot.
- The sites where shots are given should be at least 1 inch away from each other. Picture 1 inch squares, like a checkerboard. A shot may be given into each of those squares. You may choose to rotate your shots through one area, like the left thigh, then begin again in the same area. Or you may rotate through one area then go to another.
- It is very important to rotate sites. Giving a shot in the same site can make the site scarred and hard. Hard areas will keep you from using all the medicine.
What do I need to give a subcutaneous shot?
- One alcohol wipe wrapped in foil.
- One sterile 2 x 2 gauze pad.
- An ampule, vial, or pre-filled syringe containing the medicine.
- The correct size syringe and needle. Your caregiver should give you this information.
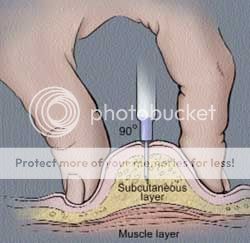
How do I inject medicine into subcutaneous tissue? Please read this section all the way through before giving the shot. It is important to get the general idea of what you are about to do before you begin. You may read this step-by-step procedure again as you do it.
- Subcutaneous shots can be given straight in at a 90 degree angle, or at a 45 degree angle. Give the shot straight in at a 90 degree angle if 2 inches of skin can be grasped between your thumb and first (index) finger. If only 1 inch of skin can be grasped, give the shot at a 45 degree angle.

- Lower back: Uncover the back from the waist to the top of the rear-end. A shot may be given just below the waist to a line that runs across the back above the crack between rear end cheeks. Give the shot between the area where the body curves at the hip and a few inches from the spine.
How can I get rid of used syringes and needles? Your caregiver may have given you a hard plastic container made especially for used syringes and needles. If you were not given this kind of container, look around your home for a hard plastic container with a screw-on top such as:
- A clothes softener bottle or a hard plastic detergent bottle for washing clothes.
- A 2 liter pop or soda bottle.
- Make sure you can put both the syringe and needle into the container easily. Whatever container you choose, make sure that the needles cannot break through the sides, bottom or top. Call your caregiver or a pharmacy to find out what your state or local requirements are for getting rid of used syringes and needles.
AGREEMENT:
You have the right to care for yourself or your loved one at home. To help with this plan, you must first learn how to give a subcutaneous injection. You always have the right to refuse the instructions on this sheet.
The above information is an educational aid only. Talk to your doctor, nurse or pharmacist before following any medical regimen to see if it is safe and effective for you.
Books and Courses
|
Great Websites
|
Excellent Stores
|
Recipe Cook Books
|
|